Translate

Monday, August 19, 2013

MOJO Monday 307 ~ One of a Kind ~ Friend


Happy Monday! MOJO Monday, that is!

Just playing along using a very fun sketch today to get the week off to a great beginning!

Hope that you get to play along too!

Stamps: Postage Collection (Hostess)

Ink: Island Indigo

Paper: island indigo, pool party, summer starfruit, whisper white, Sycamore Street DSP (retired)

Tools:scallop punches, circle punches, mosaic punch, Itty Bitty Shapes Punch Pack

Accessories:  dimensionals, basic rhinestones dauber

Hope that you enjoy your day!

Please check back tomorrow as I am participating the "Late Night Stampers Fall Treasure Hunt 2013" for your chance to win some terrific prizes...

Happy Stampin'...

~ Linda

Sunday, August 11, 2013

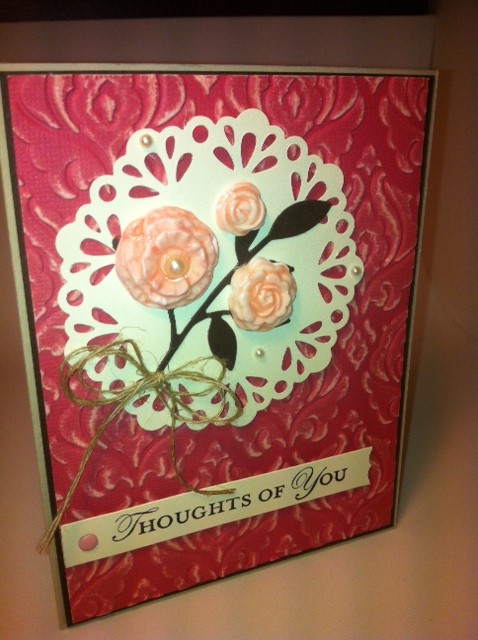
Porcelain Roses

While at the 25th Annual Stampin' Up! Convention this past July there was a lovely English demonstrator, sorry I do not recall her name, that showed how to create these oh so pretty porcelain roses.

As I was making my swaps for Convention, I thought that I would use some of these little pretties somewhere, somehow, but alas that did not happen.

So, upon my return home and in preparation for my Team Meeting swap I thought to myself how cute these would look grouped on a card and this is the result!!!

Recipe:

Ink: early espresso, pink pirouette

Stamps:  Loving Thoughts

Paper: very vanilla, early espresso, river rock, Cooredinations Primrose Petals cardstock

Tools: white simply pressed clay, buttons and blossoms simply pressed molds, doily sizzlet die,
beautifully baroque impression folder, little leaves sizzlet die, subtles candy dots, linen thread

Misc: dimensionals, sanding block, tombo glue, crystal effects, water color pen

To create the Roses :

You will need the clay and the molds. Tear off a piece of clay and roll it around in the palm of your hand and then press each piece into each mold.
Put the mold in the freezer, yes, the freezer, for 30 minutes, take out your mold and carefully pop out your flowers. I would strongly suggest that you allow them to dry overnight.

Next, you watercolor or using your markers, color the roses and wait at least 10-15 minutes to dry.
Then you carefully cover each individual flower with crystal effects and let them dry overnight.

You can also add glitter, multi-color your roses, try different embossing powders...would love to see what you create!

Happy Stampin'!

~ Linda

Tuesday, August 6, 2013

Favorite Nephew's Birthday Card & Gift Bag

This weekend I will be celebrating my favorite nephew's eighth birthday with him and his mom and dad up in beautiful Sedona, Arizona.

These are his favorite colors and I thought that I would happily create a matching gift bag to go along with his unique birthday card. Since I am posting before handing it to him, I do hope that no one up there views it beforehand.  And, you may ask what would be inside the bag? Well, I am only going to give you a hint as to what it is, something to keep him warm up in chilly Sedona! I know, I know, it is a little cooler up there in the High Country of Arizona, unlike here in sunny Phoenix!

Stamps: Bring on the Cake

Ink: Pacific Point

Paper: whisper white, pacific point, real red

Tools: postage stamp punch, mini heart punch, Cloudy Day textured embossing folder (retired)

Misc: real red ribbon (non SU), white satin ribbon (retired), dimensionals

Pretty easy card and gift bag...lately I am concentrating on creating more clean and simple items.

There also may be some upcoming Scrapbooking Classes in the near future! Stay tuned!

Happy Stampin' !

~ Linda


Monday, August 5, 2013

Bermuda Bay Dreaming


Happy MOJO Monday to all of my stamping buddies out there!

This morning I decided to play along with MOJO Monday and utilize their sketch designed by Julee Tilman. You can click on the above link to find other pretty creations.

Here are the details:

Stamps: Loving Thoughts, Friendship Wheel (retired)

Ink: Bermuda Bay

Paper: Bermuda Bay, Whisper White, Venetian Romance dsp

Tools: large oval punch, scallop punch, pretty print embossing folder

Misc: white satin ribbon, basic rhinestones, dimensionals, sticky strip, tombo glue

Enjoy!

Happy Stampin"!

~ Linda

Friday, July 26, 2013

My Paper Pumpkin Promotion!!!

Good Morning Fellow Stampers and Crafters!

I have some exciting news to share with you today!

Having attended the Stampin' Up! Convention in beautiful Salt Lake City last week, I want to share an awesome DEAL that is going on now regarding...

My Paper Pumpkin

In addition to the SU promotion, I am offering a BONUS to the FIRST person that signs up using me as their demonstrator.

You will receive an additional Paper Pumpkin Kit FREE from me!!!


Offer Dates: Now -August 31, 2013

Offer Details: Use the promotion code PUMPKINDEAL to join Paper Pumpkin before August 31, 2013, and pay only $10 a month* for the first two months.
*plus tax, where applicable. Shipping included!

The Fine Print:
  • For new subscribers only.
  • Promotion applies only to the first two months of a new subscription. 
  • After receiving two month's worth, the price for each month's kit will go to the regular price: $19.95.
  • You need to visit www.mypaperpumpkin.com to join.
  • You must click "Add Promo Code" and then enter the promo code PUMPKINDEAL in the "Promo Code" field when you sign up on the mypaperpumpkin.com website to take advantage of this promotion.
  • You must join by Saturday, August 31, 2013; 11:50 PM (MT).

Monday, July 15, 2013

Stampin' Up! 25th Anniversary Convention

Just one more day and I will be on my way to beautiful Salt Lake City, Utah where Stampin' Up! and about 6000 of my fellow demonstrators will be celebrating SU's 25th year in the rubber stamping/paper crafting, card making/scrap book making business.

With me, I will be bringing about 200+ swaps, samples to trade with my cohorts.  Each year it gets easier and easier to prepare.

This year is especially meaningful to me because my first down line, Karen Klaassen will be attending along with her down line. We are staying in the same hotel. I am looking forward to showing them and my room mate, whom also is a first timer, around the Salt Palace Convention Center.

There are a wide variety of activities to participate in, one of which is SU is asking each of us to bring a hand made greeting card addressed and stamped to send to someone. If they gather 2,000 of these, they will have broken a world record of cards being sent from one place at the same time.

One is addressed to someone whom I believe reads my blog regularly, when I post. She is the very lady that got me involved in the awesome hobby way back when...and was present when I made my very first greeting card!

Although, I will confess that I do not post as regularly as I would like to on here, if you follow me on Facebook...Linda Rodenberg, Phoenix, AZ, you can see what I am up to more often.

With that long blurb, I must say my good nights for now and wish you all a wonderful, happy week of doing whatever it is you enjoy most!

Happy Stamping Hugs,
Linda


Tuesday, February 12, 2013

~ Happy Valentine's Day! ~

Finally...I get to post on my blog.  Today is my dear husband and my 8th Wedding Anniversary!
It sure does not feel like we are married that long at all. Must mean that we have a nice long future ahead of us, a happy and healthy one at best.

In honor of Love and all of the sentiments that go along with it, I knew that I would have to share something with all of you, my dear friends out there in Blog land and now Pinterest land :)

At a recent demonstrator meeting I received a very lovely swap from a talented young lady, Stephanie Noack.  And as some of you enjoy doing, I had to CASE (copy and share everything) it!


Therefore, I made eight little Valentines that will be going out in the mail today!  Inside is a secret message spelled out in little hearts :)

Recipe:

Stamps:Teeny Tiny Verses, You are Loved
Ink: crumb cake, pretty in pink
Paper: pretty in pink, very vanilla
Tools: heart punch (large), heart punch (mini), Two Tags Die, Scallop Envelope Die
Access: very vanilla satin ribbon (retired), pink pirouette two tone ribbon, pearls, Vanilla 5/8" flower trim, sticky tape, dimensionals, tombo glue

And, there you have it! 

Happy Stamping!

~ Linda ~

Monday, September 3, 2012

Mojo Monday 257

Hope that you all enjoyed your Labor Day Weekend! My dh bbq'd a delicious flank steak tonight!

Let's get down to stampin' business now...this morning I was very excited to see today's sketch challenge over on Mojo Monday's blog. I really like the placement of the various elements on the card that I came up with, inspired of course by the sketch!

Stamps: Loving Thoughts
Ink: island indigo
Paper: DSP Fan Fair, island indigo, more mustard, riding hood red, very vanilla
Tools: fancy flower punch, hole punch, antique brad, silver brads, small scallop punch, bird punch leaf, small flower punch, jewels basic rhinestones, Edgelits-adorning accents, Emossing Folder-adorning accents

Everything just fell into place when I began with this beautiful designer paper. The colors included in the pack are: very vanilla, riding hood red, basic gray, crumb cake, island indigo, more mustard and pink pirouette.

Two of the papers are printed with lace, one has bicycles on it, one has an Eiffel Tower on it, and the no. 3 frame on the card is cut out from one of the papers with 11 other lovely adornments.

Hope that you enjoy my sharing today!

Happy Stamping!

~ Linda ~

Tuesday, August 14, 2012

Holiday Ornament ~ 2012

Good Morning!

Yes, it is a very good morning here in sunny Phoenix, AZ where the temperature is cooling off down to only 114 degrees...yesterday was hotter at 115. We do manage ok here, but I have found that I do not venture out much beyond 2pm, so I have been a little busy here in my Stampin Studio.

Have you seen the beautiful Christmas ornament on our splendid Holiday Catalog from Stampin' Up!

Well, sometimes I become a bit impatient about waiting to order something and I had a lot of inspiration from viewing a few you tube video tutorials on how to create this. So, I thought to myself, I can try to make one with the punches, stamps and paper, etc. that I already have. Not bad!

This is my first attempt, a prototype, it took me about 1 1/2 hours to punch out, cut up and glue this little pretty all together! There is no stamping involved, so that saved me some time too.

Stamps:ornament as template from Tree Trimmings (retired)
Ink: none
Paper: Christmas Cocoa (retired from a few years back)
Embellishments: cherry cobbler 3 1/2" scalloped tulle ribbon, linen thread, jewels basic pearl large, designer vintage faceted buttons, retired close to cocoa ribbon
Tools: glue gun, tombo multi adhesive, large scallop punch, ornament punch, BigZ XL designer rosette die, hole punch

Hmmm...not sure if I want to attempt to hold a private class to make these or just make them myself and give them as gifts...decisions, decisions.

Still have a few hours to get out there and run a few errands before the temperature soars.

Hope that you enjoy your day and have some time to stamp and create!

~ Linda

Monday, August 13, 2012

Mojo Monday Challenge 254

Today I was determined to participate in the Mojo Monday sketch challenge. I am going to do my best to post one each Monday.

My computer needed a physical! LOL! It has been running extremely slow lately, so with my annual anti virus renewal, I also purchased a download that speeds ol Betsy up a bit...can't say it would do the same for me :) Ok, enough on that matter...on to the important stuff...

Stamps: Moving Forward ($3 from the sale of this set goes to Ronald McDonald House)
Ink: marina mist
Paper: marina mist, whisper white, Polka Dot Parade dsp
Embellishments: jewels basic rhinestones, 1/2" scallops dots ribbon
Tools: scallop punch, 1 3/4" circle punch, dimensionals, Itty Bitty Shapes Punch Pack, polka dots embossing folder

Lately, I have had this urge to create children's cards. I suppose that I owe this to my oh so cute little twin granddaughters, Keira and Kaely. Their birthday is coming up next month and they want Strawberry Shortcake as their theme. If you have any suggestions along those lines, I would enjoy hearing from you.

Til next time...

Happy Stampin'!

~ Linda

Wednesday, August 8, 2012

SU Convention 2012 ~ I AM Creative Class

This beautiful banner was made in the optional class, which I took on Friday night at the Stampin' Up! Convention this past July.

The room was full to capacity with eager and enthusiastic stampers from all across the US and Canada. We actually had about enough time to finish this project in the allotted two hour time period.

We had some awesome concept artists to guide us in creating each of the five flags. This is always such a unique learning experience as with each of the flags there is a technique to learn. I will be sharing what I have learned throughout the year via my private classes, club meetings and in home workshops! Looking forward to seeing you!

Hope that you enjoy what I am sharing today!

Happy Stampin'!

~ Linda

Monday, August 6, 2012

Mojo Monday Sketch Challenge 253

Happy Monday Morning to all my stampin' buddies!

Today I decided to take part in, for the very first time, the Mojo Monday sketch challenge. You can follow this link: Mojo Monday Blog Let me tell you, I really enjoyed doing this!

So please allow me to share all of the Stampin' Up! goodies that I used to create this little pretty!

Stamps: Affection Collection
Paper: whisper white, cherry cobbler, primrose petals, Twitterpated designer paper package
Ink: cherry cobbler
Accessories: jewels basic rhinestones, antique brads primrose petals 3/8" stitched satin ribbon, Sizzlets large delicate doilies, textured impressions lacy border embossing folder, adorning accents embossing folder, 
Tools: heart punch, blossoms punch, itty bitty shapes punch pack, sticky strip, dimensionals, hearts collection framelit, paper piercing tool, stampin' pierce mat, big shot

Please leave a comment, I enjoy hearing your thoughts about what I post on my blog.

Happy Stampin' !

~ Linda

Wednesday, August 1, 2012

Stampin Up SPOOKTACULAR OFFER!!!


During August, we've only got treats-no tricks-for our new recruits! New demonstrators will get a FREE Howl-o-ween Printer's Tray project kit-a $60 value-just for doing what they already love. But it gets even better-when I recruit, I will get a FREE Howl-o-ween project kit too! That means that we get to create this beautiful project together!

For only $99 you can create you very own personalized  Starter Kit, choosing up to $125 in any current Stampin' Up! products!

Today also begins the release of our awesome Holiday Catalog! You will not want to miss all of the unique items that you can order for all of your Holiday Celebrations!

Stamp Club is this Friday at my home! If you would like to sign up for my next round, please contact me and I will be more than happy to add you to the list.

Happy Stamping!

~ Linda

Friday, July 27, 2012

~ Stampin Up Convention Gifts Swap ~


Hi Everyone!

Now, if you attended this year's Stampin' Up! Convention in beautiful Salt Lake City, UT...and you were part of my down line, you would receive one of these little pretties!

There were way too many ideas swimming in my head pre-convention as to what to create as gifts for my fellow stampers...so, this year's idea was inspired by my lovely friend, Laura Fernsler.

What do you think? It is a mixture of multi-media items on a 4x4 artist's canvas. I so enjoyed making these, that I believe there will be more in the future!

Would you like one of your very own? Join my Team : Pretty Inkers AZ and sign up on my demonstrator website...prettyinky.stampinup.net I will be sure to get one out to you asap!

Hope that you enjoy your day...and be sure to fit some stamping into it!

Til next time...

~ Linda ~

Thursday, July 26, 2012

~ Stampin' Up! Convention 2012 ~ My Swaps ~


The theme for this year's convention was "I am". At several times throughout this amazing week, we were asked by various SU individuals how to fill in the blank. My chosen word was ~ Appreciative!

Being a part of this awesome company and all of the blessings it has provided me in my life, I thought the word appreciative was quite appropriate! I am appreciative of all of the lovely ladies that I have met throughout my 4+ years as a SU Demonstrator. So very many wonderful memories that I have shared with many of you, my blog buddies, etc...the list would take a book to fill...so instead of writing a book, today I will share my swaps that I took to convention this year. Enjoy!


The above was an organized swap hosted by Laura Fernsler. We each had to create 6 Big Shot flowers to swap. I received 6 lovely pins that I just can's wait to wear! Thank you Laura!


This was a 3-D item that I made for General Swapping. It is a water bottle tag with a packet of pink raspberry lemonade! I just LOVE an ice cold glass of this during the summer! Enjoy!


How about these little purses! I just LOVE purses! A girl cannot have too many purses...LOL!
The newsprint one on the left I received a sample at Leadership earlier this year and the little pink one was inspired my Lorri Heilling. It was originally a nugget purse, I enlarged it so that it would hold a different candy...dare I  put chocolate in it...would never have made it to Salt Lake City! :)
Oh, have I ever shared with you that I am a chocoholic? Oh, dear...

Well, please stay tuned for more Convention goodies that I will be posting...

Hope that you enjoy your day/week...and make some time for stamping!

Lotsa Hugs...

~ Linda ~

Thursday, May 31, 2012

Bye Bye Blushing Bride


This pretty card was cased from Pat Brannin. She does some beautiful cards and I always appreciate her style when I receive them at Stampin' Up! events. Thank Pat! We used Blushing Bride card stock, such a soft, subtle pink, which is retiring, but may just make a comeback...keep my fingers crossed!

Hope that you enjoy what I share with you! I welcome your comments!

Thanks for stopping by!

Happy Stamping!

~ Linda

April Tea Party Class


In April's Saturday Morning Stamp Cafe we made the above two cards for class. We had a fun time having tea, snacks and of course, stamping!

~ Linda

Sunday, May 27, 2012

~ Hostess Club Forming ~

Hi Stampers!

Although I have not posted for quite a while, I have been contemplating a few changes to my
Stampin' Up! class offerings.

Currently, I am hosting in my home my Monthly Saturday morning Stamp Cafe, where each third Saturday of the month anyone can attend for a fee of $12.00 and create and take home two cards and a cute three dimensional item, along with light beverages and snacks.

Also, I am going to begin a monthly Hostess Club where six people sign up and commit to being a Stampin' Up! Hostess either in my home or theirs and each person gets a turn to be a Hostess. This includes a minimum of $25.00 in Hostess dollars for free when it is your turn!

Our very first Hostess Club will be the week of June 9th, and luckily you can join in the fun and adventure by contacting me for more information...

E~mail:  Lindam530@cox.net

Phone:  (602) 481-8587

Our New Stampin' Up! catalog will be going live on June 1st and I am very excited to share one with you!

Happy Stamping!

~ Linda

Saturday, April 7, 2012

Happy Easter!


All I need to know
I learned from the Easter Bunny!
Don't put all your eggs in one basket.
Everyone needs a friend who is all ears.
There's no such thing as too much candy.
All work and no play can make you a basket case.
cute tail attracts a lot of attention.
Everyone is entitled to a bad hare day.
Let happy thoughts multiply like rabbits.
Some body parts should be floppy.
Keep your paws off of other people's jelly beans.
Good things come in small, sugar coated packages.
The grass is always greener in someone else's basket.
To show your true colors, you have to come out of the shell.
The best things in life are still sweet and gooey.
May the joy of the season fill your heart.
AND MAY GOD BLESS YOU!
Happy Easter!

Linda :)

Thursday, April 5, 2012

Dazzling Details

101 ways to use Dazzling Details!

1. To outline the letters in your titles.
2. To outline the patterns, pictures & designs on your patterned papers.
3. You can add a little shimmer by spreading it around with your finger!
4. Use on handmade cards.
5. To make flowers glittery.
6. To make “glitzy photo corners!”
7. To make firework photos glittery!
8. To make the “trails” from butterflies and dragonflies.
9. To doodle dots and stitches.
10. Use it on stickers to really make them look special.
11. To outline the veins in leaves.
12. To add to the clothing stamps to make them look ready for a night on the town!
13. To make brads sparkly!
14. To make ribbon sparkly!
15. To make icing on cupcakes and cakes shimmer.
16. To make waves look 3-D.
17. For making cherries/fruit shimmer as if wet.
18. To make the “fire” on the end of a birthday candle!
19. To make rain drops or water drops from a watering can.
20. To make fairy dust around a fairy’s wand.
21. To decorate your kids school supplies instead of buying designer stuff.
22. To cover entire cutouts.
23. Use over the designs on grunge board. It looks great!
24. To add droplets on your Halloween LO’s.
25. To cover clear embellishments entirely and make them oh so sparkly!
26. Use under transparencies, to adhere them. Looks great for bubbles!
27. Use for decorating t-shirts.
28. Use dots to border a page!
29. Use for slug trails.
30. Use for snail trails.
31. To decorate tennis shoes.
32. To decorate buttons.
33. To decorate ribbons.
34. To make a spider web sparkle in a Halloween LO.
35. Use on handmade tags.
36. To add bling to hats or crowns.
37. To make jewelry gleam!
38. To make belts shine!
39. To add pizazz to purses & some shine to shoes!
40. To all or any misc accessories!
41. To decorate lots of things, especially stamped swirls or flowers.
42. Use generally anywhere on your LO, just to add some bling!
43. To make a circle or square of dots to frame closely in on a face or object in a photo.
45. In the center of flowers.
46. Use along swirly-swirls!
47. To make a thin (or thick!) border around anything (or everything!) on your page.
48. To highlight the shadow on stamped letters.
49. To stamp with them!
50. To embellish concert LO’s.
51. To make flourishes on your flourishes and make them look embossed.
52. To add bling to a star.
53. Use in flames to make them shimmer, glow & come alive!
54. To enhance Cotton Candy!
55. To enhance Candy Canes!
56. To enhance Icicles.
57. To enhance Water & Waterfalls.
58. To enhance Oranges.
59. To make the lines of a shooting star!
60. Use as paint (dot a little then spread with paintbrush)
62. To make a proper Disco Ball!
63. You can tear paper snow for cards or layouts & run it along the top edge of the snow.
64. To enhance ghost shapes or flakes. Add in the center of snowflakes.
65. Add to anything that you stamp!
66. To enhance paper piercings.
67. Use on die cuts.
68. To outline the jewel with Stickles.
69. To outline a journal box.
70. To decorate a cast.
71. To decorate gift bags.
72. To decorate wrapping paper.
73. Use on feathers for Mardi Gras or Las Vegas LOs.
74. Use with a stencil instead of ink.
75. You can print out stuff from Google, add Dazzling Details to make homemade sparkly stickers!
76. Add to the top of Thickers.
77. When glitter comes off of stickers/paper, you can fill it in with Dazzling Details to make it back to normal! Use it to glue more glitter on top of the sticker!
78. To make the eyes on a Disney Princess cut with your Cricut.
79. To create rays of sunshine!
80. To create a rainbow!
81. To make a heart (or hearts) shine!
82. To make stars glitter & shine!
83. To make moonbeams shine!
84. Use on diecut Christmas trees to make the bulbs sparkle & shine!
85. Add to your own Christmas ornaments or Christmas ornaments as gifts!
86. To add shine to a trophy.
87. To a title block.
88. To add sparkles to a Shamrock.
89. To add sparkles to an Easter Egg.
90. To add rays of light to a Christian cross.
91. To create firework frame around something (For example, a name or an object!)
92. To make fish glimmer.
93. To make water reflect (ocean, lake, waterfall, ripples, streams, fountain, aquarium, etc.)
94. To make a reflective mirror.
95. To highlight Art Deco from the 60’s, 70’s, 80’s or 90’s found in the backgrounds of pictures.
96. To highlight a monogram.
97. Use on inchies.
98. Use on tear bears.
99. To add bling to automobiles.
100. Use on your Disney Princess pages.
101. Use on everything & anything & as long as you still have Dazzling Details to use!
 
Enjoy!
~ Linda

Tuesday, March 27, 2012

Contest Winner!

Donna Gagnon is the winner of the beautiful Apothecary Art stamp set!

Congratulations on many hours of stamping fun with your new toy!

Friday, February 24, 2012

~ Free Stamp Set From ME !!! ~


As you all know by now, Sale~A~Bration is in FULL SWING!!! With each $50 purchase you make you are eligible for a beautiful FREE item from the current Sale~A~Bration catalog...WELL I want to make your purchase even sweeter :)

With each $50 purchase you make through me, you will be given a chance to win the above Apothecary Art wood mount stamp set valued at $34.95!!!

So, go ahead and make your purchase either by emailing me, phone, or via online and your name will be placed in the basket.

The drawing will take place the week of March 24th...you have about one month to enter!!!

Happy Stamping All!

~ Linda

Saturday, December 24, 2011

~ Merry Christmas ~


During this Christmas season, I would like to wish all of you a very Merry Christmas and a Happy and safe New Year.

In January, I will be attending the Stampin' Up! Leadership Conference in beautiful San Antonio, Texas.
During that time, I will be learning and creating with our beautiful paper products and will be hosting a class on Saturday, January 28th, 2012 at 10am in my home. Please email me: Lindam530@cox.net if you would like to attend.

Enjoy the time spent with your family, friends and loved ones!

Stampin' Hugs and Blessings...
Linda Rodenberg, SU Demonstrator
Lindam530@cox.net

Monday, October 31, 2011

~ Big Shot Offer Extended!!! ~


An offer to DIE for!


If you've been looking for an opportunity to do what you love, while getting a 20% discount on your favorite products, now is the perfect time! During October, you'll get a FREE Big Shot when you join the Stampin' Up! family as a demonstrator.

* If you already own a Big Shot then you can choose $100 worth of merchandise from our current catalogs. Use the Big Shot die-cutting machine and Stampin' Up!'s exclusive dies**(sold seperately) to create uniquely beautiful projects in a flash.

In addition, the new-demonstrator Starter Kit--a steal at just $175--contains over $345 worth of stamp sets, card stock, ink, accessories, and business supplies-everything you need to start your new business.

There are so many benefits of being a Stampin' Up! demonstrator, including

•A 20 percent product discount!

•A free monthly issue of Stampin' Up!'s demonstrator-only magazine, Stampin' Success!

•Sneak peeks at brand-new products!

•Invitations to exclusive Stampin' Up! events!

•Regular get-togethers to stamp!

•Free access to an online community of 30,000+ crafters/stampers and creative artists, as well as 160,000+ project samples!

•Plus, access to an exclusive video and training for your new Big Shot!

•Join my team and attend our monthly meetings with other demonstrators who share their love of Stampin' Up!

Don't miss this BIG deal! Contact me today to learn how you can take advantage of this great opportunity and get your FREE Big Shot!

Happy Halloween!!!

Happy Stamping!!!

~ Linda

Monday, October 17, 2011

Pines and Poinsettias


This was a make and take for our monthly downline meeting of the Dazzling Divas. This card was just about a total case of one that I found somewhere and I sadly have misplaced the name of the lovely artist, so if anyone knows her, please contact me and I will surely give her credit.

This card just exudes the warm and fuzzy feeling of the Holiday Season, of which my favorite is Christmas.
I just LOVE the real red and chocolate chip combo...it reminds me of red velvet cake :)

This little pretty is by no means simple...and I totally enjoyed using our beautiful specialty designer paper from the Holiday Mini...Holiday Berry Bouquet in all its' glory here!

This is the beginning of my making merry for the upcoming celebrations, parties, gatherings with family and friends, near and far.

Happy Stamping!

~ Linda ~

Blog Archive

Followers

Stampin' Up! Webring

Powered by WebRing.